9 Must-Know GoHighLevel Website Builder Tips + New Updates
GoHighLevel’s website builder has really grown on me since I started using it last year. In fact, I liked it so much that I moved my agency’s main website to GoHighLevel. But when I first started, building pages and writing content took forever.
After spending more time with the builder, I found 9 things I wish I’d known earlier. In this post, I’ll share those tips with you so you can build websites faster on GoHighLevel ↗️.
Plus, I’ll include some of the latest updates they’ve added to the website and its builder.
9 Must-know GoHighLevel Website Builder Tips
1. The Curly brackets Keyword Shortcut { for Custom Values
Let’s start with one of my favorites—the curly brackets { Keyword Shortcut for custom values. If you’re not using this yet, you’re missing out! It makes adding custom values to your website super easy, and it saves so much time. Plus, it's a handy way to include elements like logos or addresses when sharing your site as a snapshot ↗️.
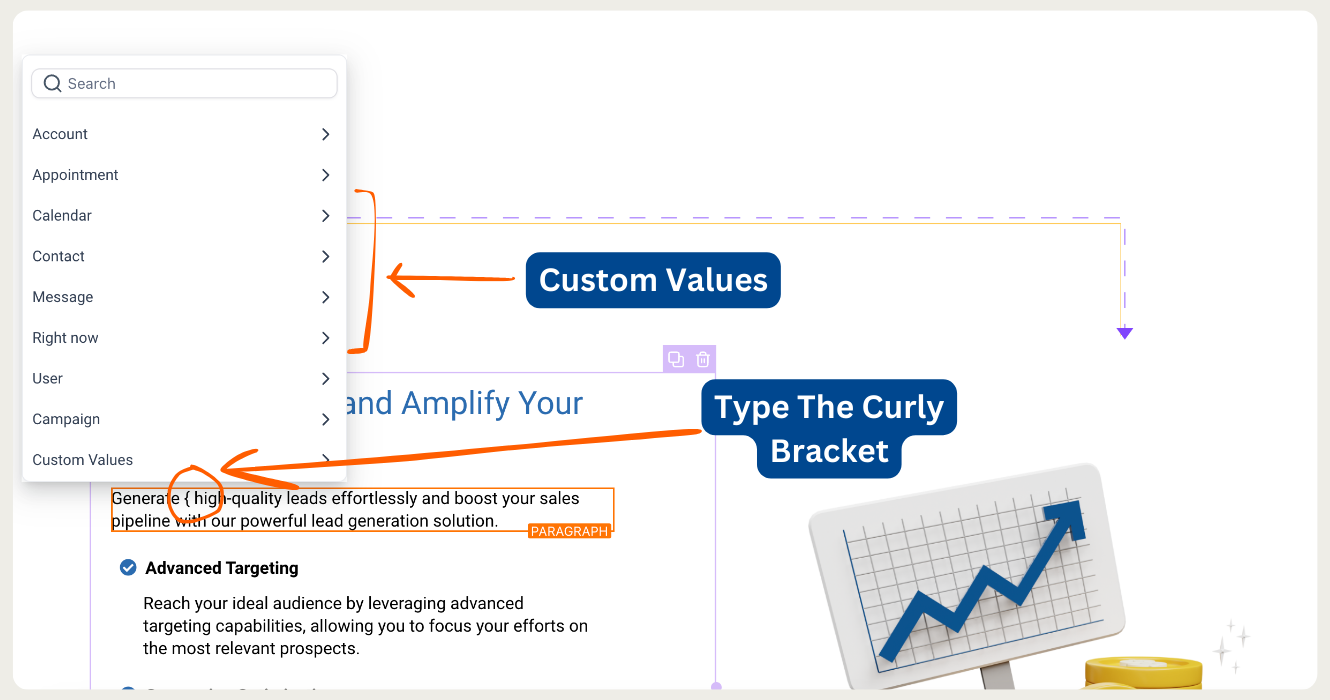
Why is it useful? You can quickly add things like:
Your website logo
Address info
Links to terms & conditions or privacy policies
Anything else that custom values can handle
When you share your site as a snapshot ↗️. whoever gets it can update their custom values, and everything (like logos and links) will change automatically. There is no need for them to dig into the site and change things manually.
How to use Custom Values:
Go to your sub-account’s settings.
Click on “Custom Values.”
Create or Pick the value you want to change.
Add the link or data you need.
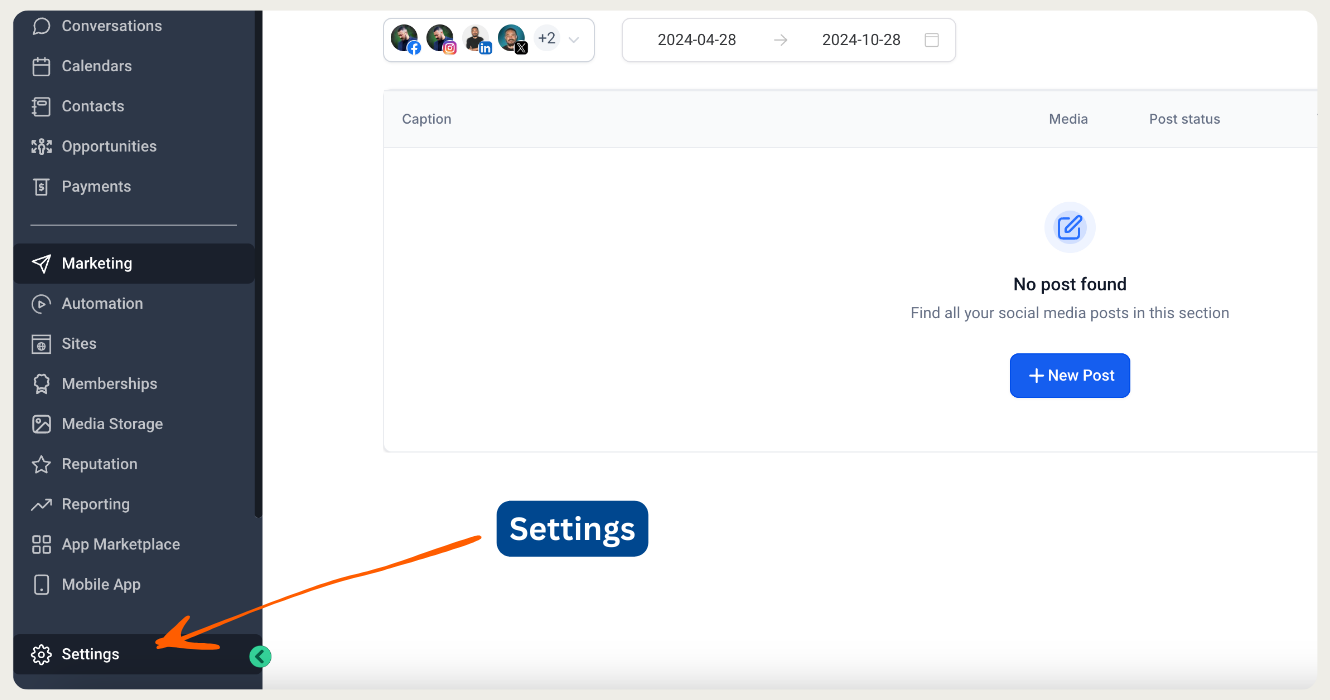
1. Settings in sub-account.
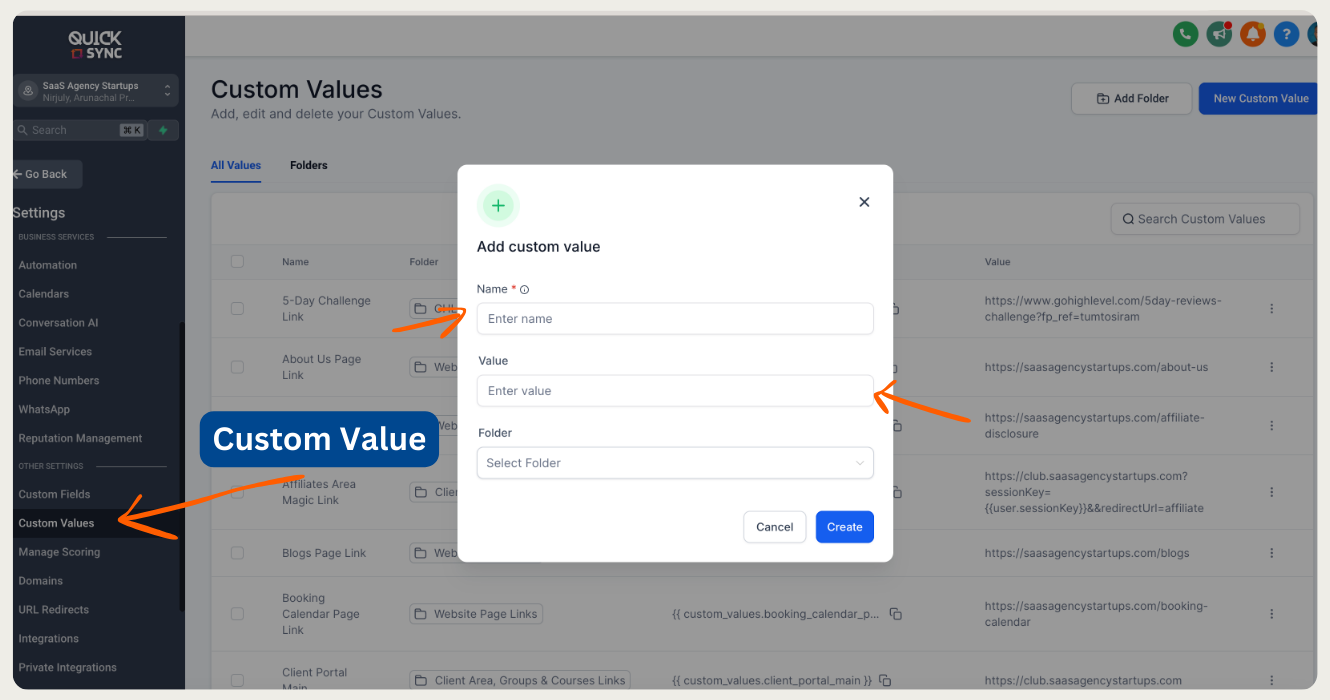
2. Custom value and how to create a new one.
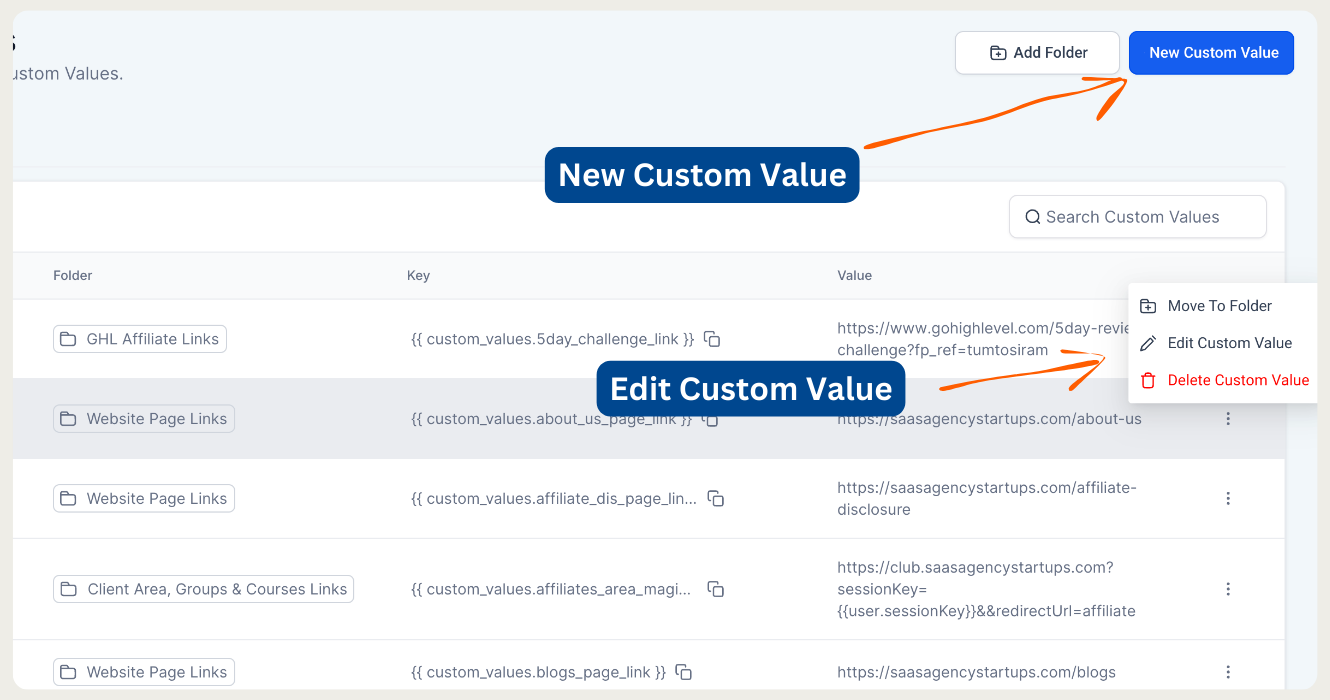
3. How to edit an existing one.
2. Write Like a Pro with the GoHighLevel Content AI. Use the ‘Highlight’ Feature
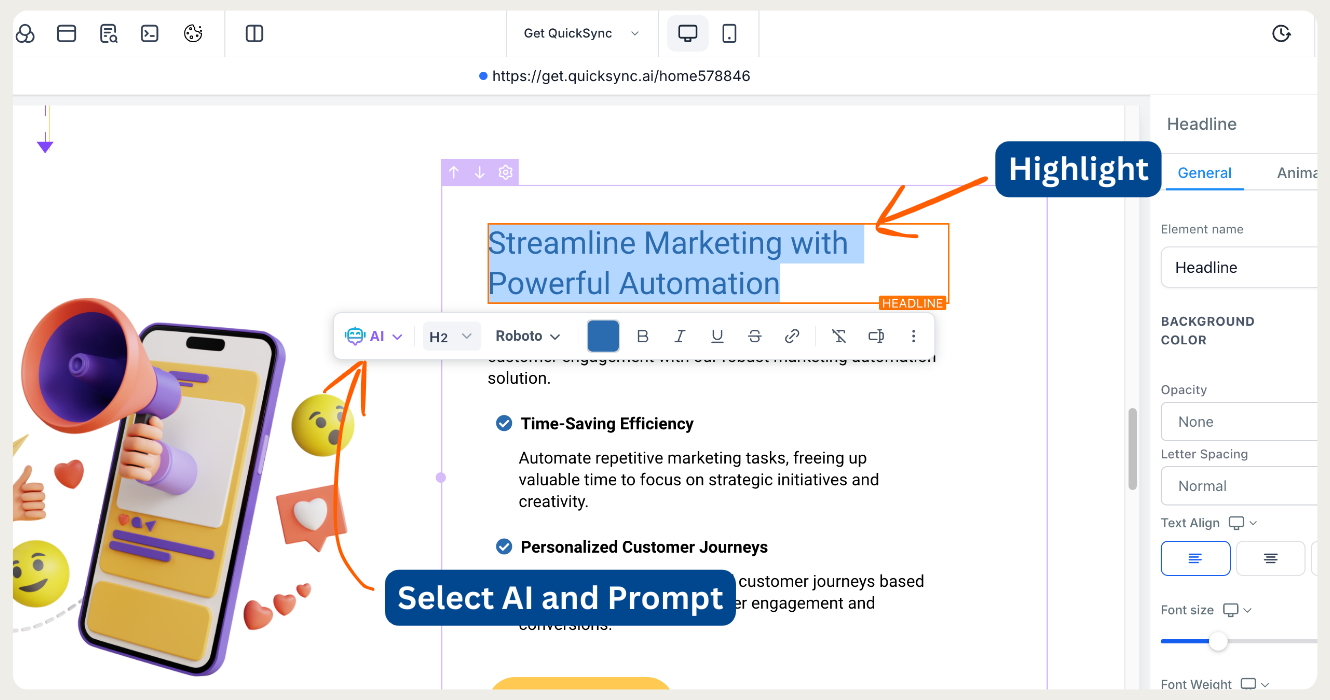
Need help with writing content? GoHighLevel’s AI feature ↗️ can help. Just select the text you need help with, select the AI and the Content AI will write it for you.
It works for Blog posts or website copy and even email templates and social media posts in the marketing section. So, if you want to speed things up but still sound professional, this tool is a game-changer.
How to use it in the website page:
Highlight the text you want to edit.
Click on the “AI” option in the editing toolbar.
Choose a prompt from the dropdown, and let the AI handle the rest.
Quick break—if you want a step-by-step guide to mastering GoHighLevel and building your own SaaS business, check out my FREE course! You’ll also get access to my exclusive group, where we dive into strategies for success. Here’s the link ↗️!
3. Speed Up Your Workflow by Duplicating Blocks
Here’s a cool trick—Just duplicate the block for similar sections. One thing that annoyed me with the website builder was the default sizes for paragraphs and bullet points. Paragraphs would always be 14px, and bullet points would be 20px. I had to adjust them every time, and it was a hassle.
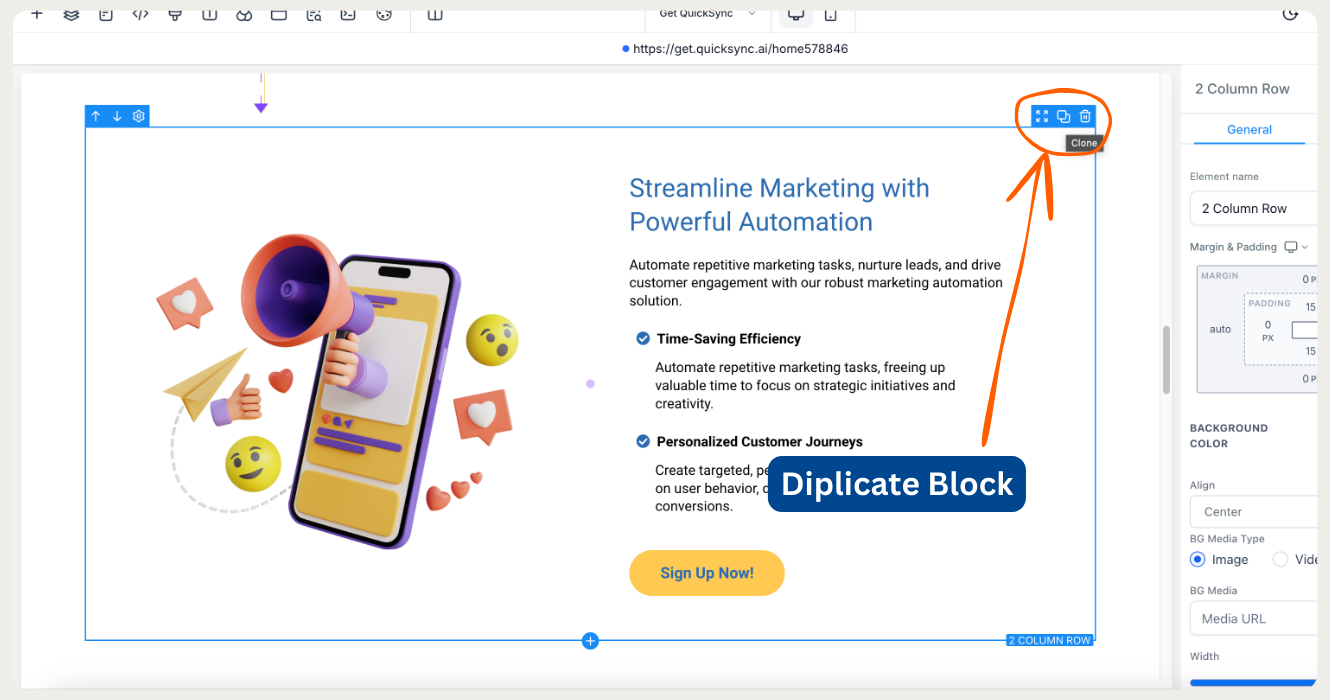
To save time, just duplicate the block or element. That way, you can keep the same formatting for paragraphs, bullet points, or any other element.
How to do it:
Select the block or element.
Click the copy-paste icon on the right side of the editor.
4. Master Consistency with Global Sections & Section Templates
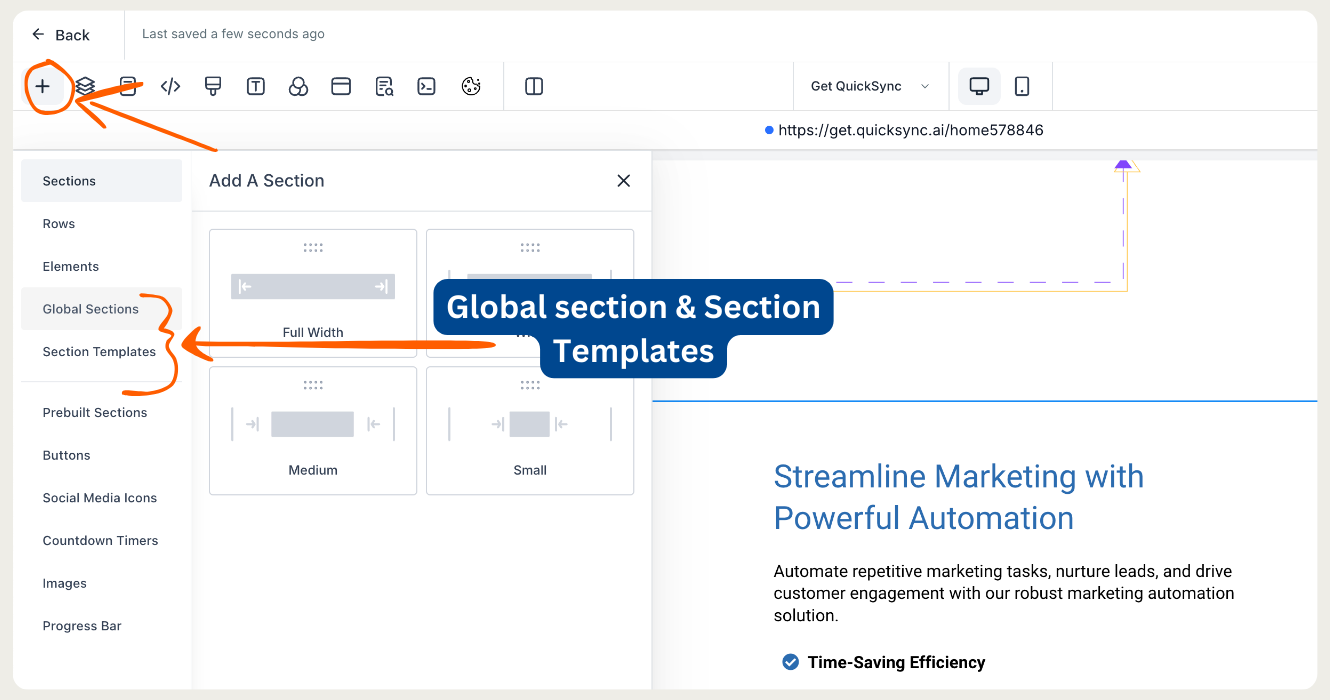
Consistency is important for branding when building a website. GoHighLevel makes it easier with Global Sections and Section Templates. These features let you update a section, such as your header or footer, and the changes will automatically apply to all your pages—no need to edit each one individually!
Here’s the difference:
Global Sections: Perfect for headers or footers. You can save a section and any edits will update across your entire website.
Section Templates: Great for reusable sections like FAQs or CTAs. You can use them on multiple pages, but changes in one section won’t affect the others.
All you have to do is select and drag the section from the element bar and drag it to where you want to add it.
How to save a block:
Select the block you want to save.
Click “Save” at the top left of the block.
Name the block and choose either “Global” or “Section Template.”
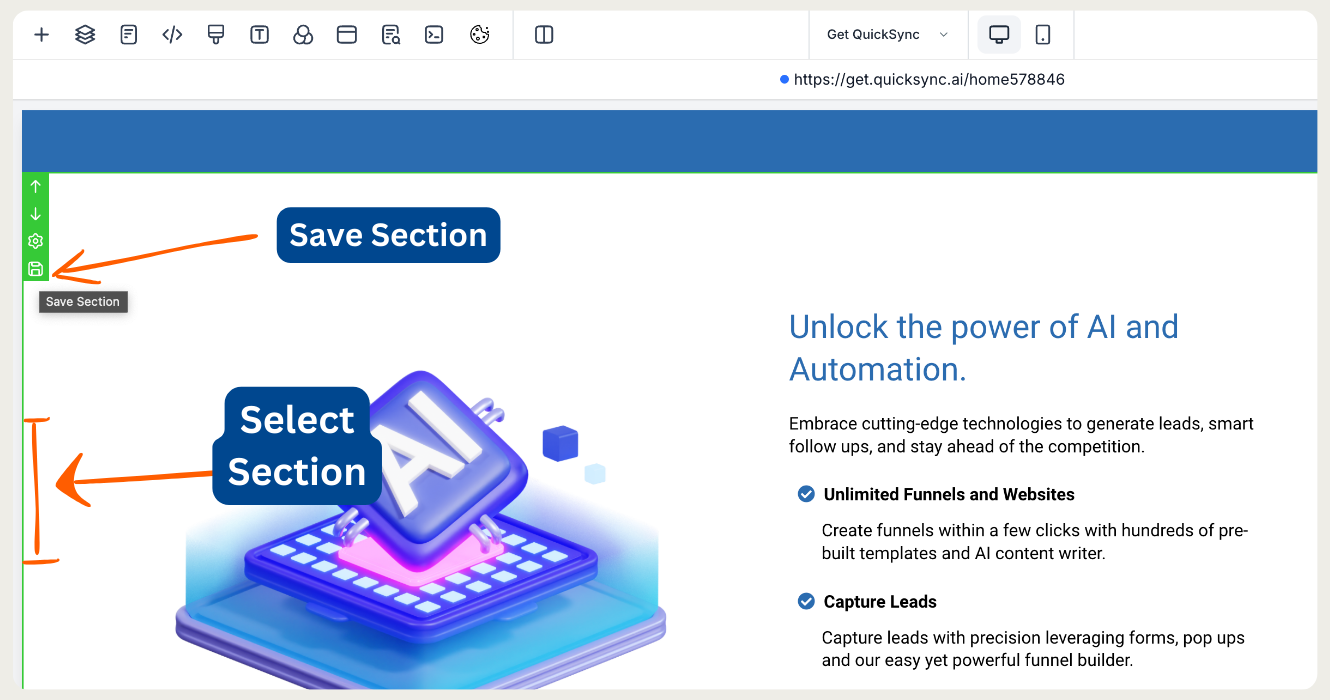
1. Select block and save.
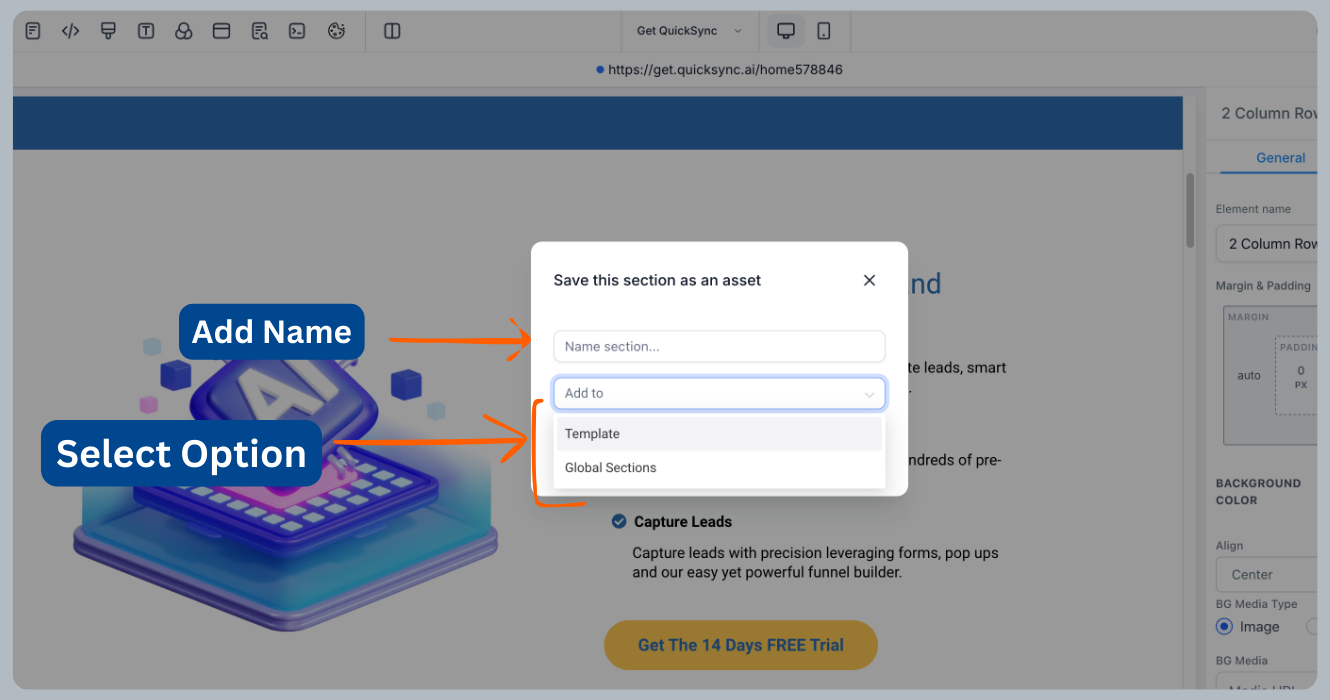
2. Add name and choose whether to save as Global or Template.
5. Typography Matters—Customize Fonts for Consistent Branding
Now, let’s talk about fonts. I missed this feature for a while, but it’s super helpful. GoHighLevel ↗️ lets you customize the text with link colors and fonts to make sure your site looks consistent. You can easily pre-set them, so you don’t have to change them every time.
Why is this important? It keeps your branding consistent. For example, the default link color is blue, but with this feature, you can change it to match your brand’s colors with just one click.
How to use it:
Open the editing bar on the top left of your page.
Click the “T” icon for typography.
Customize the headline font, content font, link color, and more.
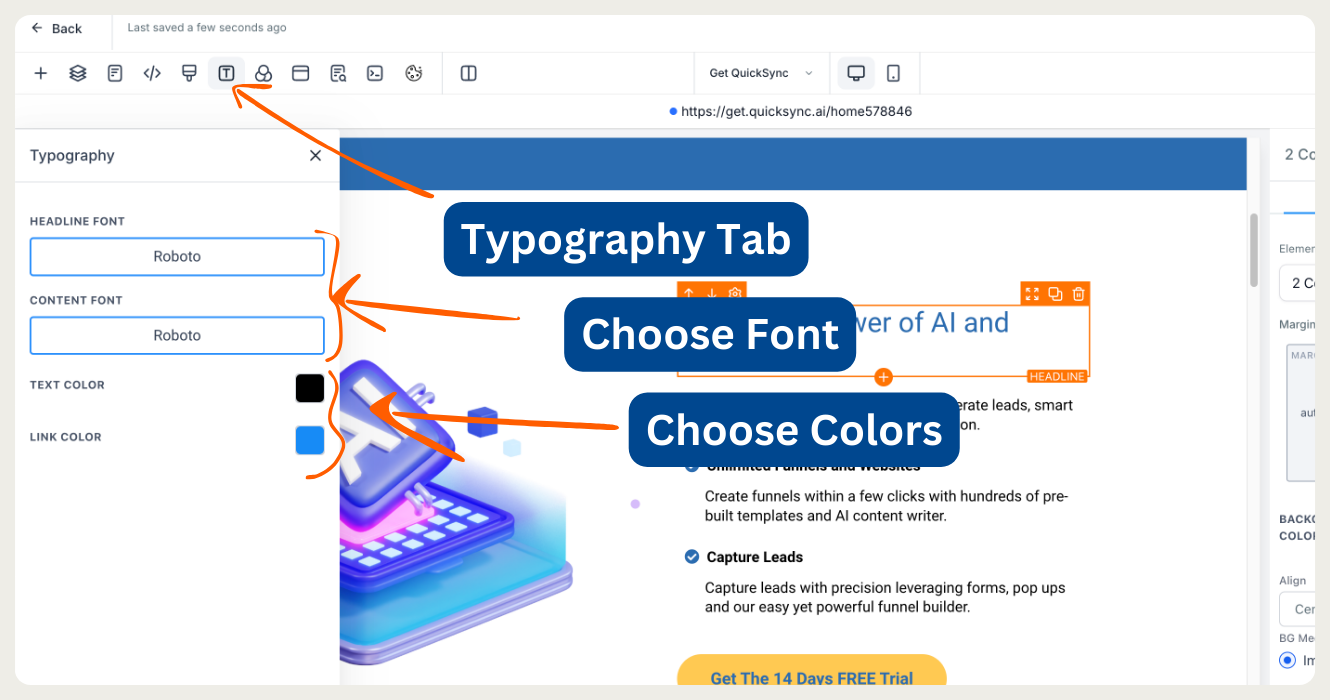
The only drawback is you’ll have to do this for every page. I wish there were an option to choose whether this applies sitewide or not.
Pro tip: Save your brand colors in the “Brand Board” so you can quickly apply them later.
6. The Page Selector in the Editing Tab
As a former WordPress user, I used to finish editing a page, go back, and open a new page from the editor dashboard to edit other pages. This wasted so much time! In GoHighLevel, you can switch between pages right in the editor without having to leave and come back.
How to do it:
Open the editing tab.
Click on the “Pages” icon (It looks like a page).
Select the page you want to edit next.
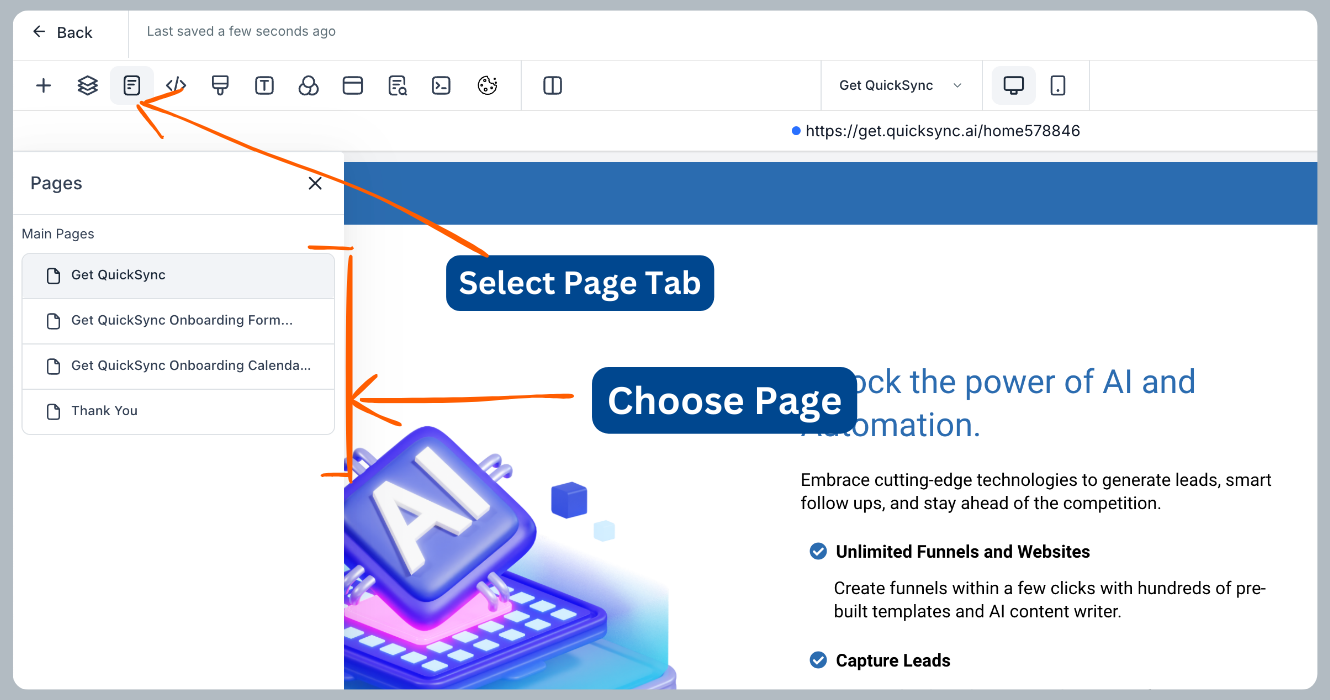
7. Use the Media Section for Easy Image Management
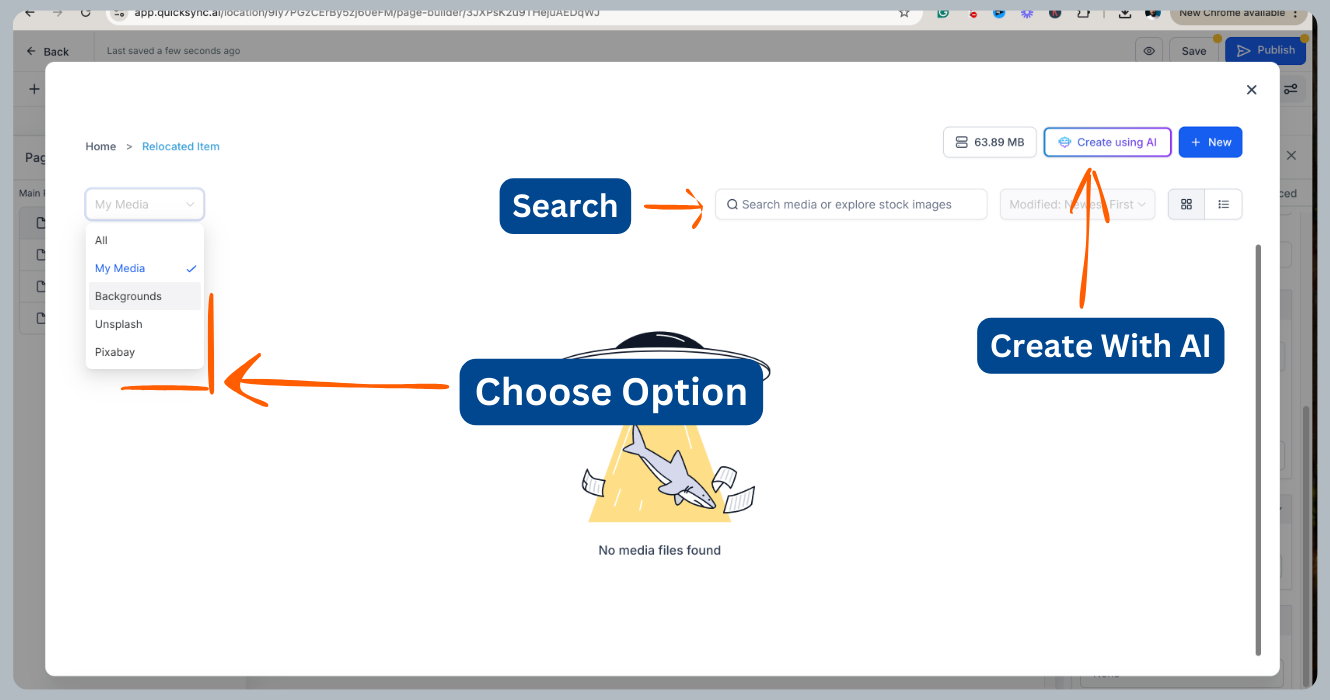
Need images for your site? Instead of always creating them on Canva, you can use GoHighLevel’s Media Section. It offers free stock images from Pixabay and UpStock, perfect for quick website images. If you want to try further, you can also try GoHighLevel's AI to create images.
How to use it:
Select the image element.
Click “Add Images.”
Choose from “Background,” “Pixabay,” or “UpStock.”
Search for an image and select the one you want.
8. Naming Sections & Managing Layers
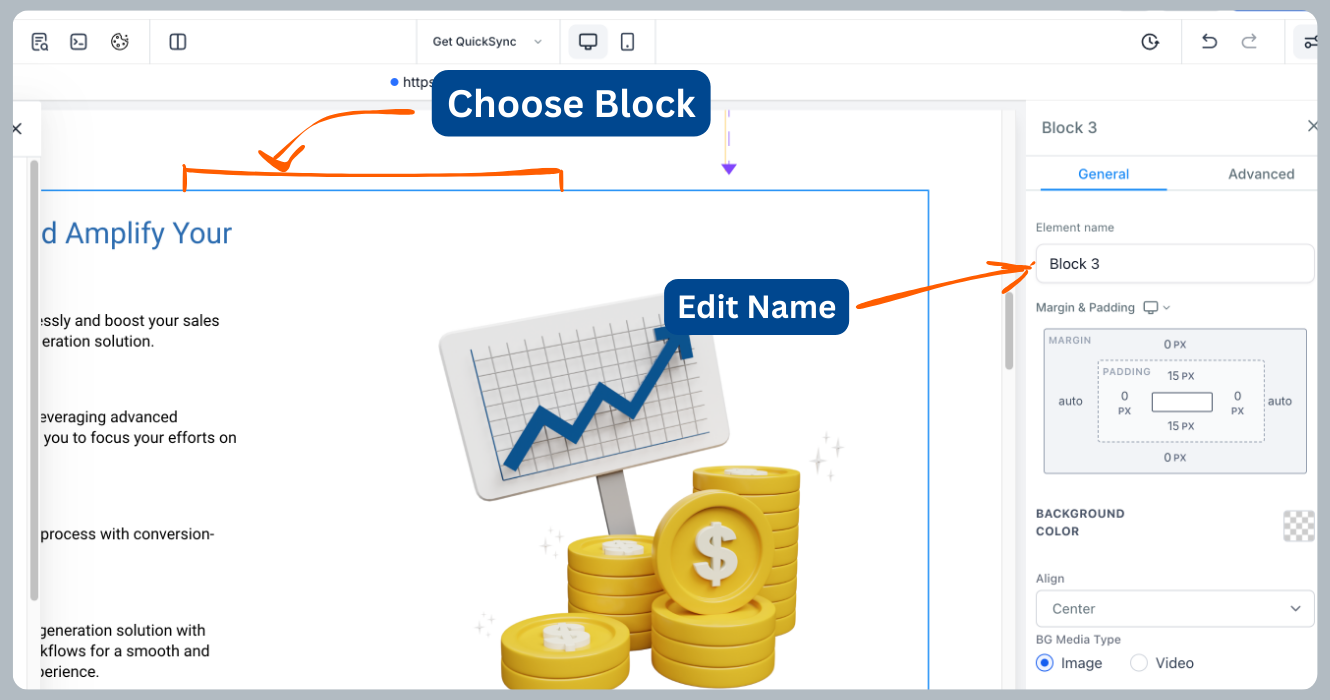
When you build a page in GoHighLevel , you use blocks, rows, and elements. One thing I didn’t realize at first was how useful it is to name your sections and rows. Naming them makes it easier to spot them to manage and rearrange your content.
Why name sections? It helps you stay organized. For example, if you have a testimonial section below the FAQ but want to move it up, you can quickly find and drag it to the right spot.
How to name sections:
Select the section or row.
Name it in the right editing bar.
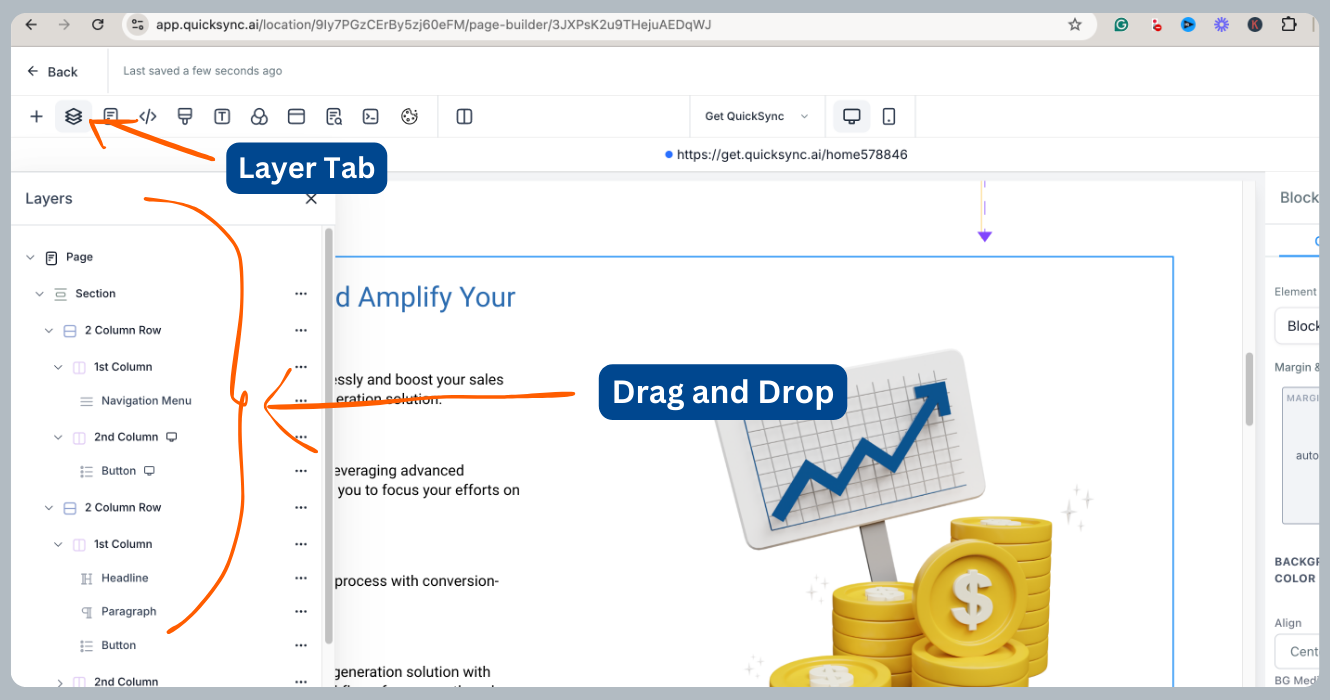
How to rearrange elements:
Click the “Layers” button in the top right.
Drag and drop sections or rows as needed.
9. Block Visibility for Mobile and Web
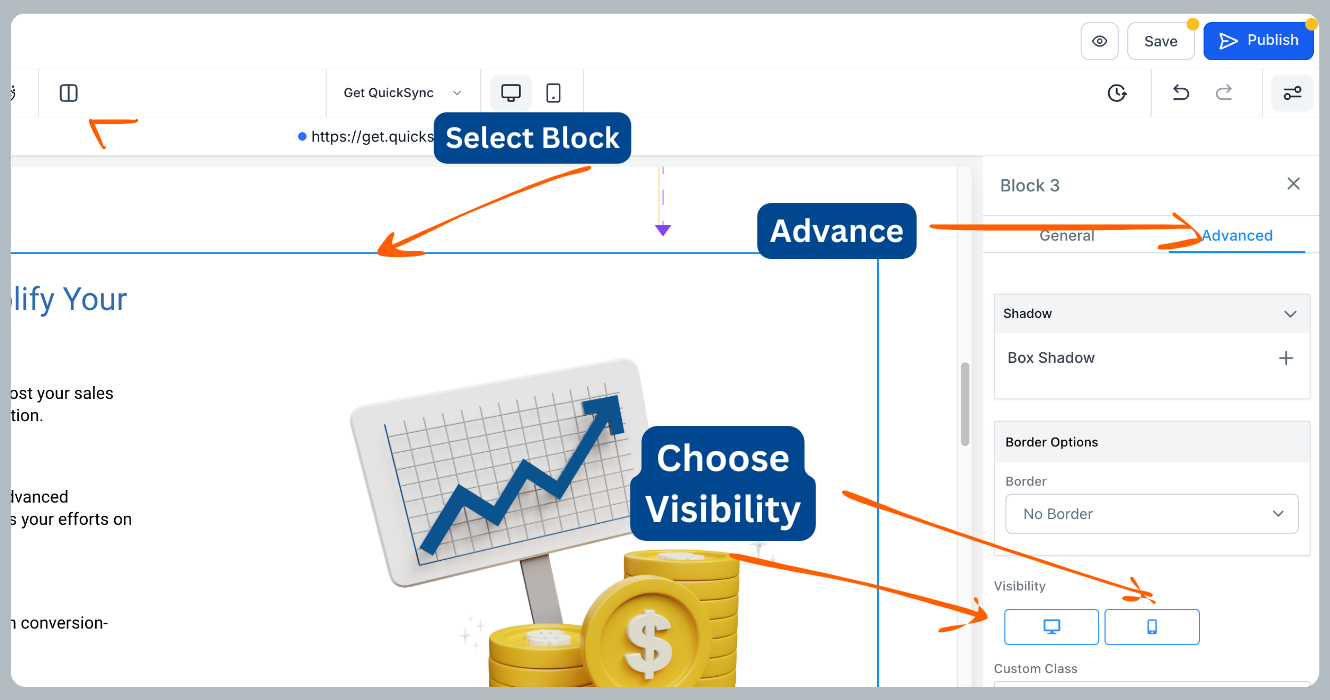
Finally, let’s talk about block visibility. This feature lets you decide which blocks or elements show up on mobile vs. web. It’s handy when a design looks great on the web version but not so much on mobile.
For example, you might have an image on the right and text on the left for the web version. But on mobile, you want the image first. You can hide the web version on mobile and create a different block just for mobile.
Pro Tip: Instead of building a new block from scratch for mobile, just duplicate the block, make one visible for the web and one for mobile, and rearrange the content.
How to do it:
Select the block or element.
Go to the “Advanced Settings.”
Adjust visibility (Web or Mobile) under the “Visibility” option.
And there you have it! These 9 tips will help you build websites faster and more efficiently with GoHighLevel. Try them out and see how much time you save!
Now, for the exciting part—New Features! GoHighLevel has rolled out some awesome updates to the website builder. I’m adding these because they’ll make your site-building experience even smoother. So let’s dive into what’s fresh!
Latest Updates on The GoHighLevel Website Builder
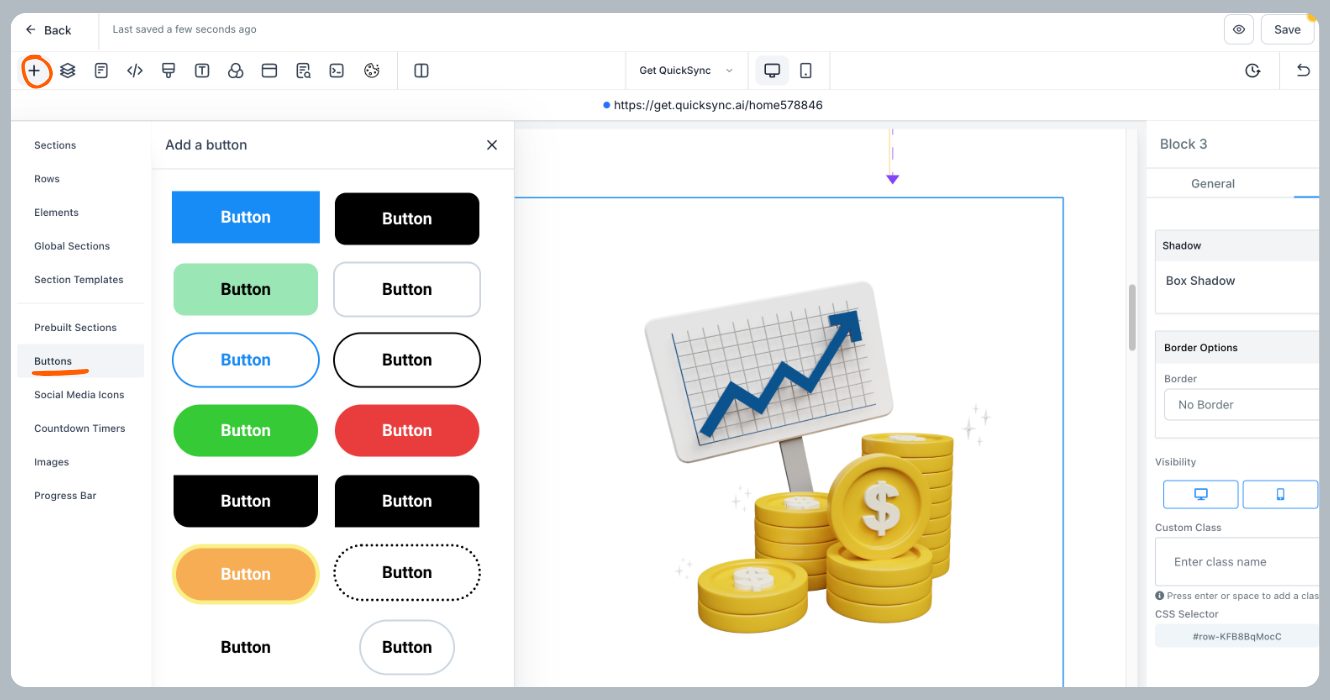
Update 1: Supercharge CTAs with Buttons
First up, Buttons. They’ve always been there, but now you’ll find them on the left side of the editor for easier access. If you’re used to them being on the right, this might take a bit of adjustment, but it’s meant to speed up your workflow. Now, you can grab attention and improve your call-to-action game faster.
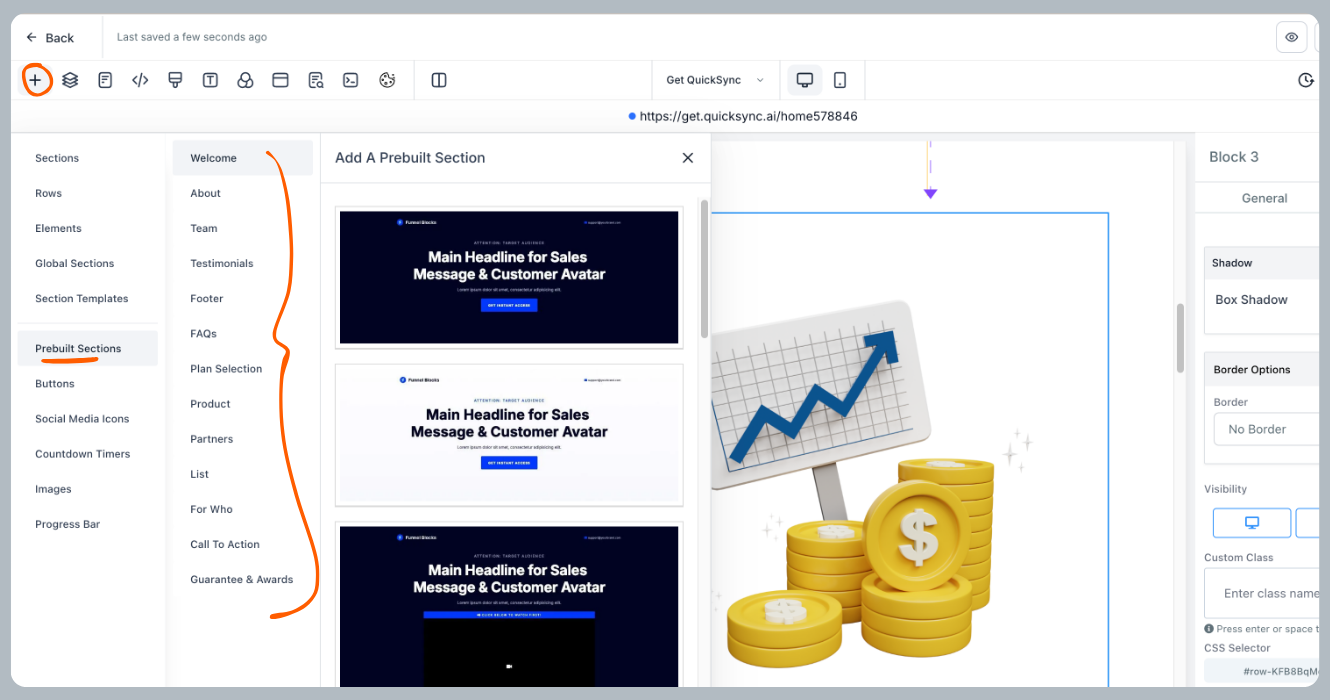
Update 2: Get a Head Start with Prebuilt Sections
No more starting from scratch! Prebuilt Sections let you drag and drop fully designed, beautiful sections straight into your site. This is a perfect shortcut to create high-converting pages without wasting hours on design. Just plug and play!
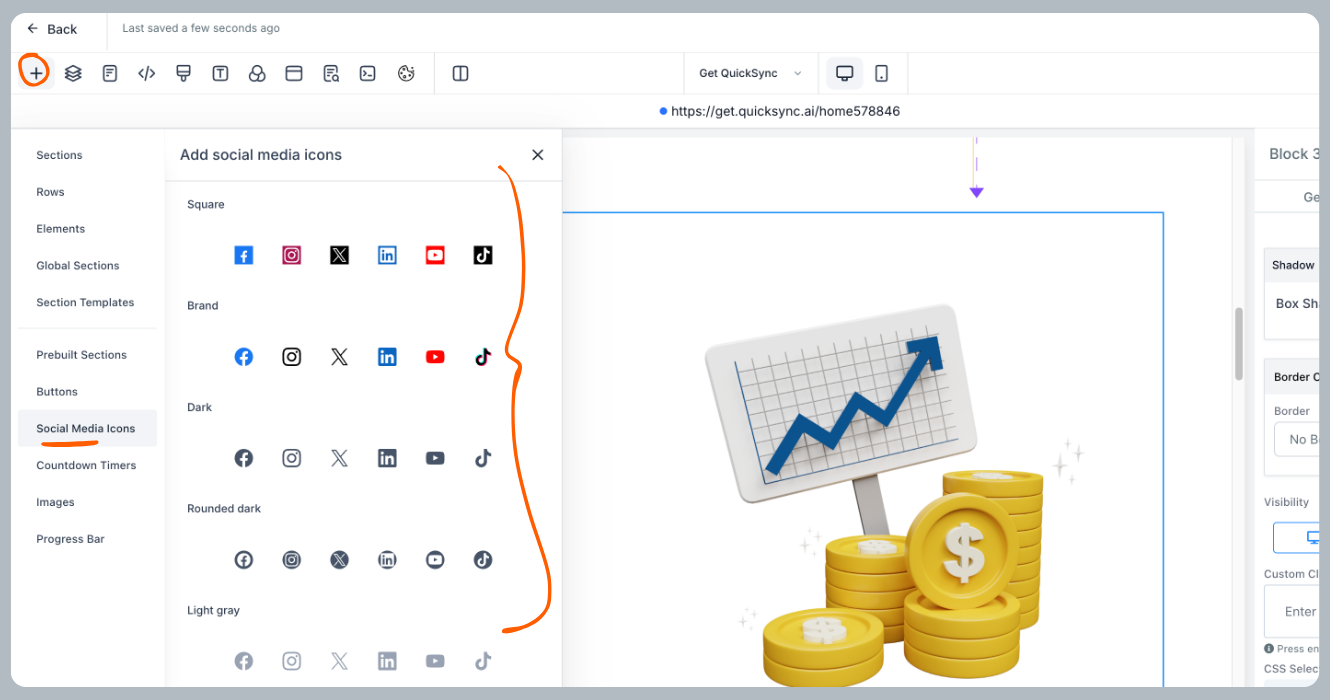
Update 3: Add Social Proof with Social Media Icons
Here’s something that caught me off guard recently—I couldn’t find the Social Media Icons! Turns out, they’ve moved to the left menu. If you want to add your social links, that’s where to go. Plus, they’re super simple to integrate, adding instant social proof to your site.
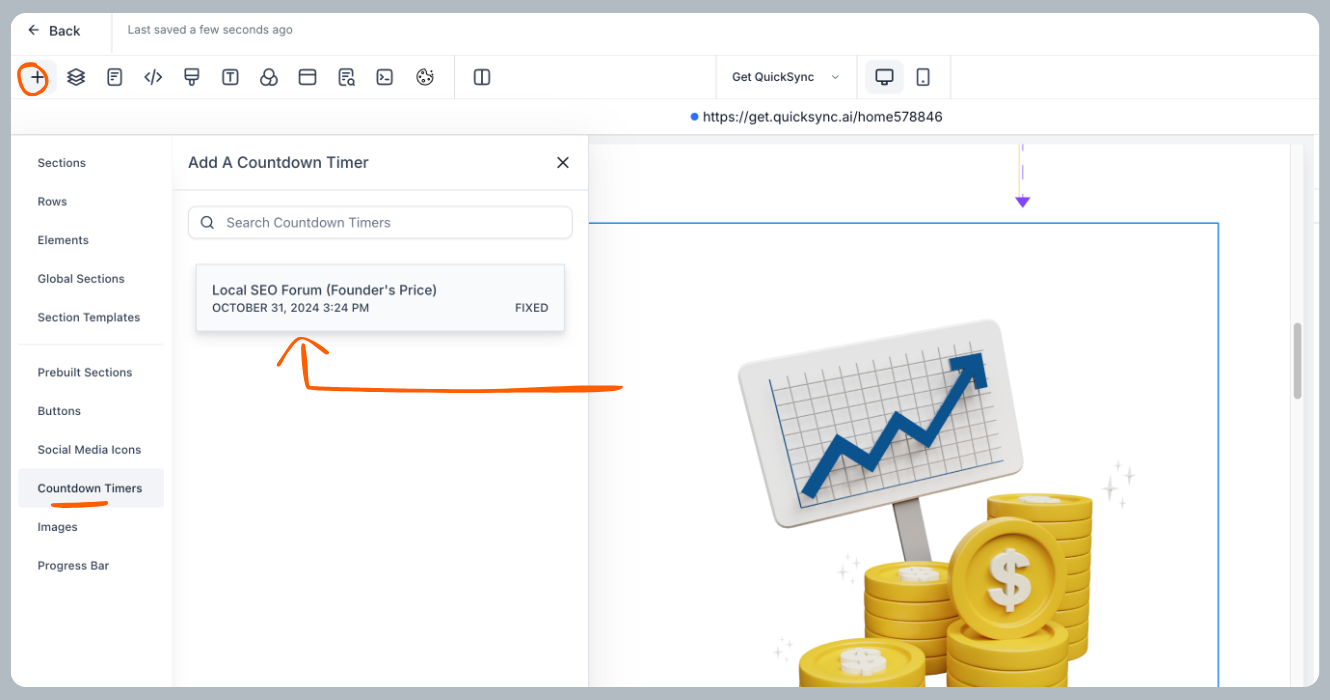
Update 4: Boost Urgency with a Countdown Timer
If you’re looking to drive faster conversions, the Custom Countdown Timer feature is for you. Whether it’s for a sale, event, or limited-time offer, this tool lets you add urgency. And we all know, urgency is one of the best ways to get visitors to act quickly.
To be able to add it, you'll have to create it in the marketing section first.
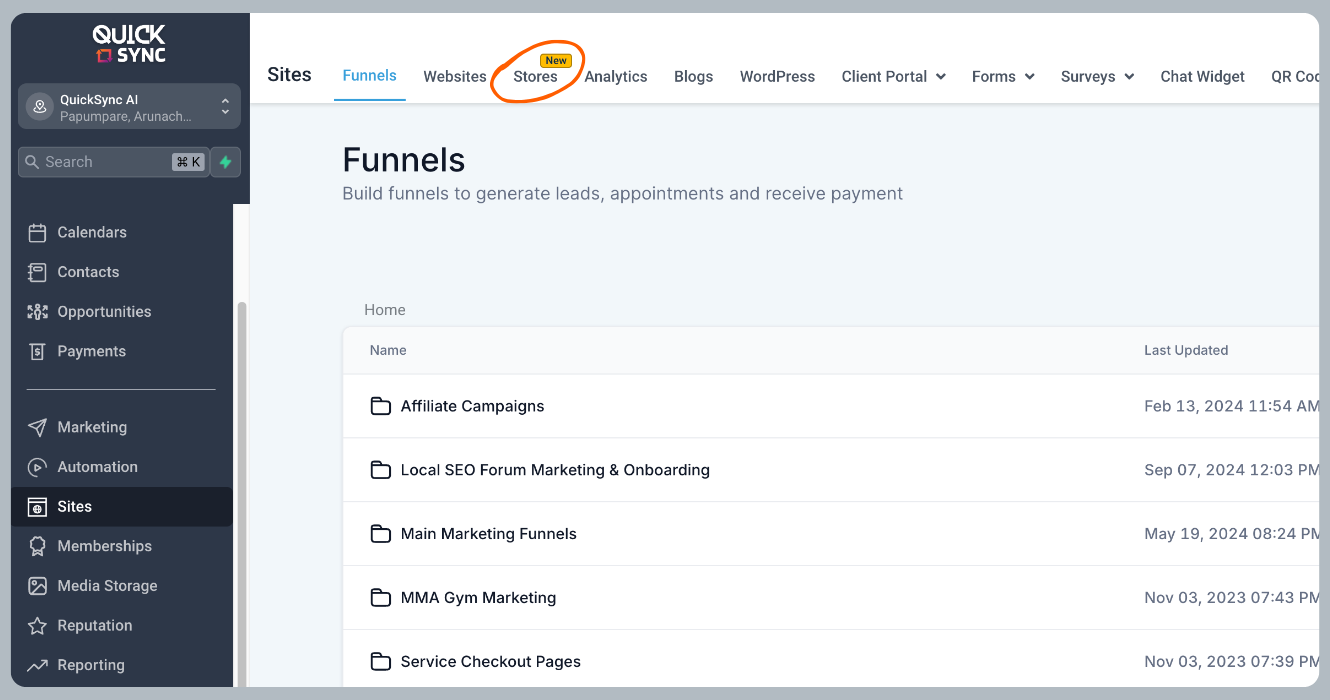
Update 5: Build Your Own Store with Ease
This one’s a game-changer for anyone in eCommerce—GoHighLevel now lets you build stores directly on your website. You can manage products, orders, and payments all from within the platform. If you want an all-in-one solution for your online store, this is it.
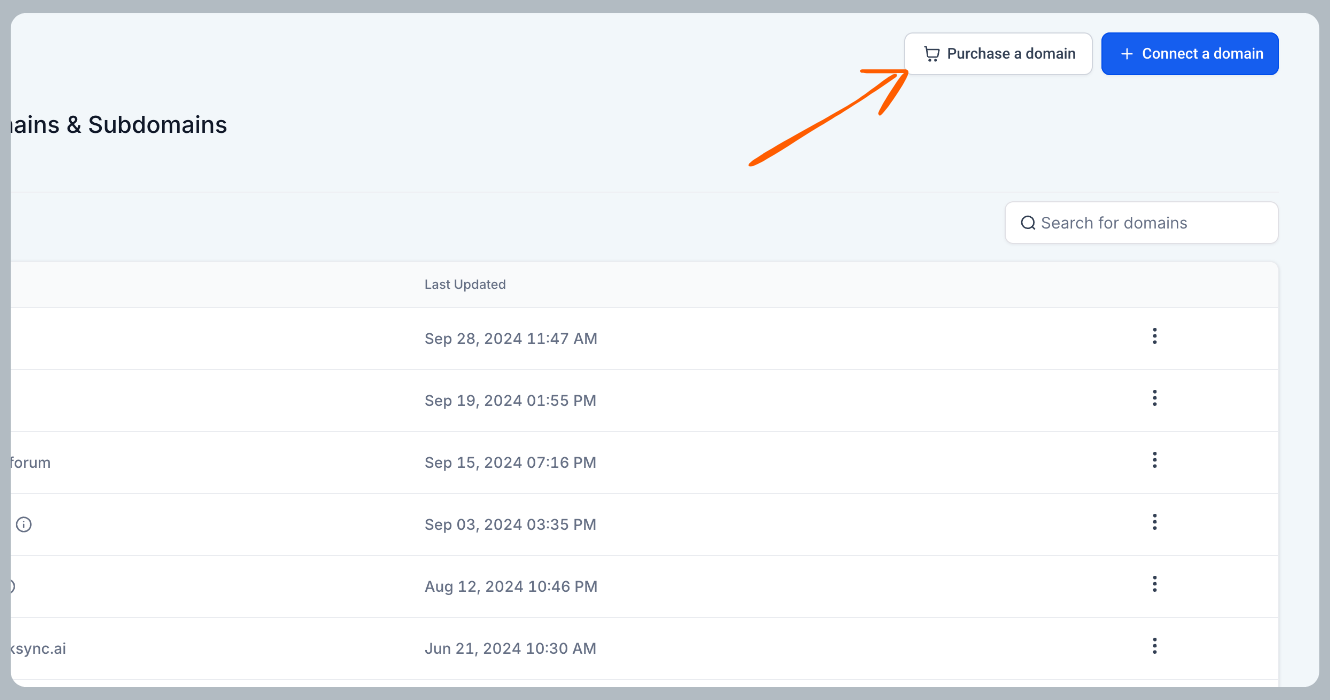
Update 6: Buy Domains Right Inside of GoHighLevel
Now, GoHighLevel makes it even easier to get your website live by letting you buy domains directly from the platform. No more jumping to third-party domain providers. You can purchase, set up, and manage everything in one place.
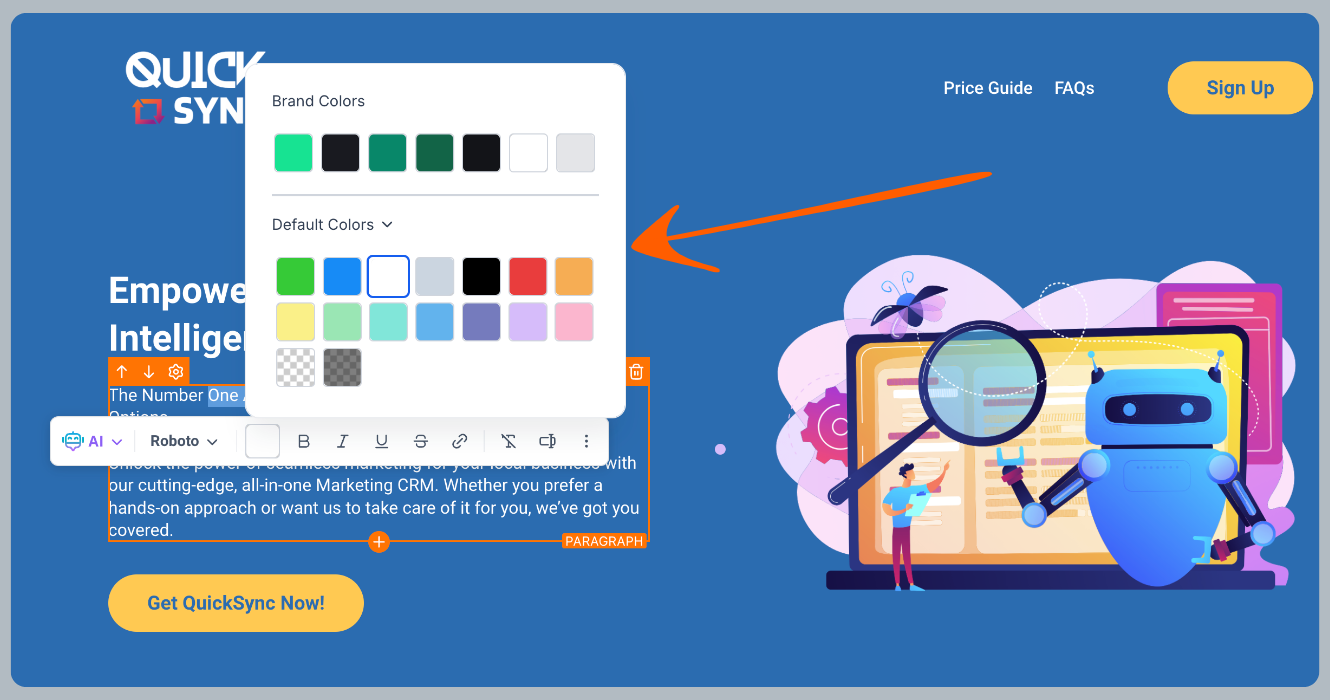
Update 7: Fine-Tune Your Branding with the Color Picker
Lastly, the Color Picker got a nice upgrade! It pops up right when you need it, making it quicker to match your brand’s colors. Just highlight the text and you can change the color right there.
Previously, you had to go back and forth to the settings to change colors, but now it’s much simpler. I’m really hoping they’ll add gradient options for buttons, text, and backgrounds soon—it would take customization to the next level!
Before I wrap up, don’t forget to check out my course Quick SaaS Launch ↗️, where I guide you step-by-step on building your own SaaS business to landing clients within a few days. Plus, join the Private group ↗️ for weekly tips, coaching, and networking!
Conclusion
That’s a wrap on the 9 game-changing tips and the exciting new updates to GoHighLevel’s ↗️ website builder. I hope these tricks and features will save you time and make your website-building process smoother than ever!
If you found this post helpful, be sure to follow me on my YouTube channel ↗️ to stay updated on more GoHighLevel tips and tutorials. Have questions or want me to cover something specific? Send me an email or reach out on my socials.
